Airtable provides a neat interface to view and edit your data. Depending on your needs, you might use it as the primary data source for your application.
Airtable provides automation, but it's limited compared to what a low-code platforms can do. Furthermore, the number of executions is restricted, even for paid plans.
This post will show how to perform the basic CRUD operations, write comments, read attachments, and use webhooks with Airtable.
Authentication
We need to set up authentication before we can use the API. AirTable comes with two token types; personal access tokens and OAuth tokens (plus user tokens, but those are deprecated). Personal access tokens are usually the best choice if you just want to connect with your own AirTable account. You can use them to perform all CRUD operations, but you cannot add comments or use webhooks with such tokens. According to their docs, you should be able to, but these calls result in permission errors. Setting up OAuth is explained later in this post. For now, you'll get away with a personal access token.
Creating a personal access token
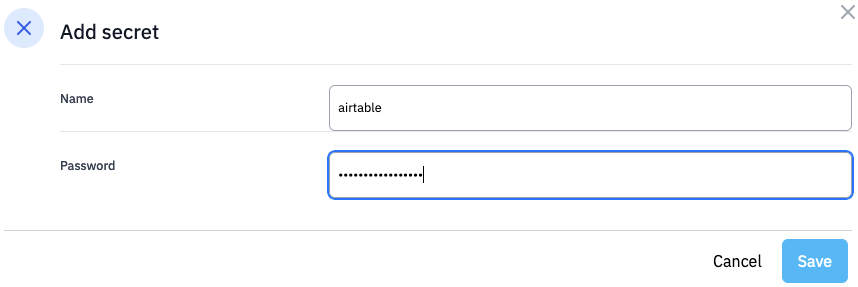
You can create a personal access token from your Airtable account page. The secret key is provided once, after which you have to store it in a safe place. Throughout this post, we assume that you have stored it in a Flowlet secret. To do so:
- Go to the Settings section in your Flowlet workspace.
- Click the Secrets tab and add a secret of the type "Password”.
- Give it the name "airtable” and paste the secret in the password field.
Reading table records from the Airtable API
Airtable provides the list records endpoint to read rows from a table. A simple curl command is provided as an example, which is replicated below for reference.
curl "https://api.airtable.com/v0/{baseId}/{tableIdOrName}" \
-H "Authorization: Bearer YOUR_TOKEN"
This guide uses curl only for setting up webhooks, so you probably don't need it to continue. Otherwise, you might want to learn more about it in our post on CLI tools.
Several query parameters are available to specify the number of rows and fields returned or to filter the rows. We will get to them later, but let's test this call first.
There are three parameters that you need to replace. The easiest way to get the baseId and tableId is to go to the table in the Airtable interface. The URL looks like the example below:
https://airtable.com/appQdymUzauE3QcNz/tblryynEqL4RRBP2C/viwfuYLsObB2xUMZ2
This URL is formatted as follows:
https://airtable.com/{baseId}/{tableId}/{viewId}
So, the baseId is appQdymUzauD3QcNd, and the tableId is tblryynEqL8RRBP2C for this example. You may look at the first three letters to check your ids. They start with "app” for the base and "tbl” for tables.
To perform the API call in Flowlet, create a new re-usable flow and drag the loose pin labeled "in” to add an HTTP-request block.

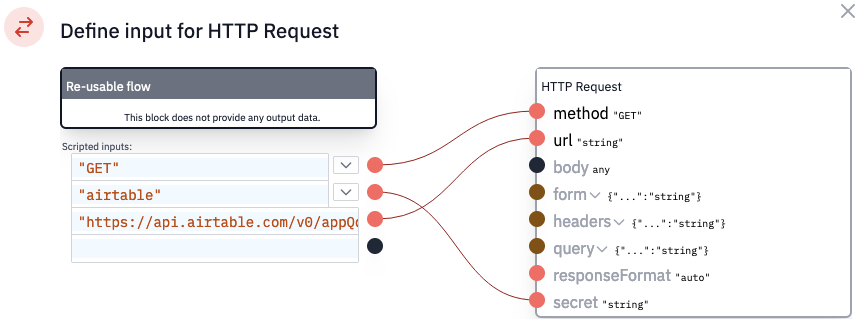
A new dialog comes up where you need to specify the input for the HTTP request. We'll enter the URL in the text field on the bottom left. These fields are in JavaScript or JSON format, so be sure to enclose the URL with quotes, as seen in the screenshot below. Also, drag the pin aside from the next empty text field to the "secret” pin on the right. A dropdown appears right of the text field where you can select the value "airtable”. Providing the secret will add your personal access token to this request. There is no need to specify the authorization header, and you can keep this configuration free of confidential values. After entering all the details, the configuration will look like the one below.
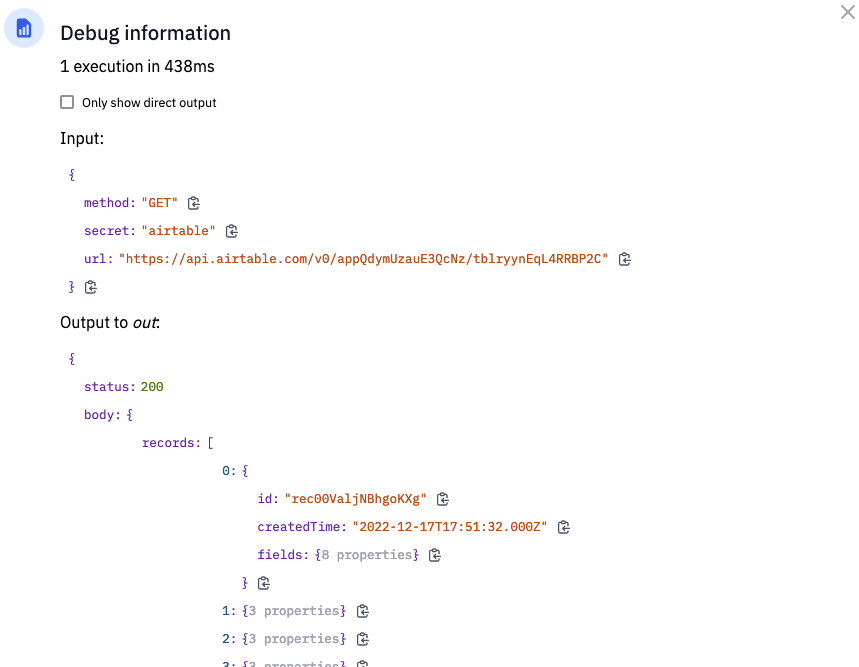
We can already test this API call. Click the "Test flow” button on the top right and click on "Run flow”. The HTTP request block will light up green if it runs successfully. Furthermore, a new icon appears on that block. Click it to inspect its input and output. You will see the data from Airtable here.
Furthermore, a half-transparent block with a sparkles icon appeared entitled "Validate”. That is a suggestion. You can click on the sparkles icon wherever you see it to accept a suggestion. In this case, it will transform into a normal block.

You should always validate responses of external systems, even when it comes from a well-known API. The reason for this is twofold. First, check for erroneous responses (API might be down or misbehaving). Secondly, defining the response type allows you to use the data quickly in the flow. After accepting the suggestion, click on the config icon of the validate block and choose "Edit schema”. You'll see that a schema was already generated from the API response. That's also why you see the suggestion only after running the flow.
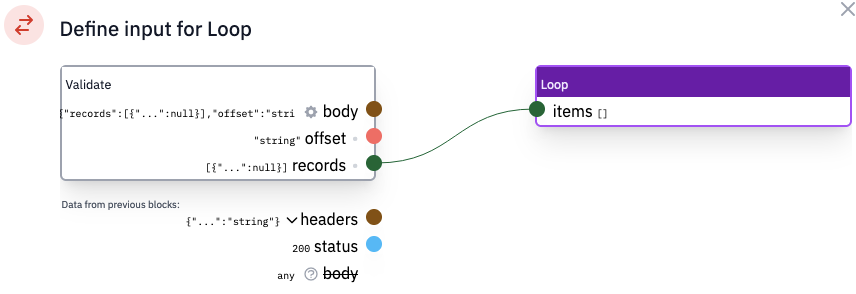
Drag the "valid” pin of the validate block to continue building your flow. You might loop over the returned records, for example.
Reading attachments
If you have attachments in the records, you'll notice that the field value is an array with some details per attachment.
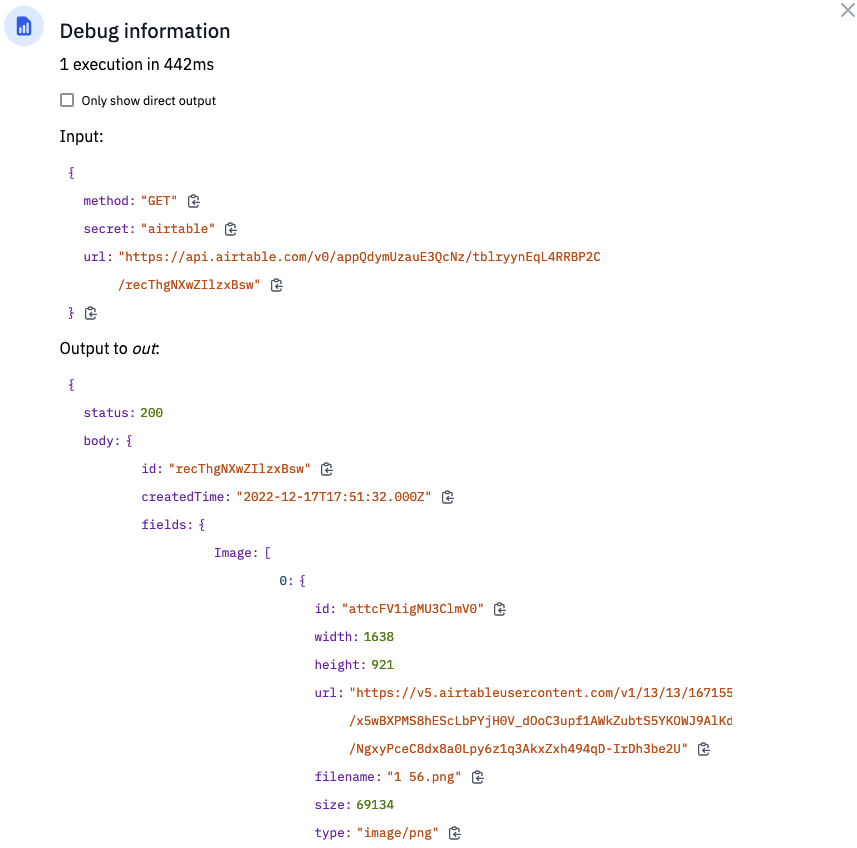
The URL shown in the response does not need authentication. Yet, this link is valid for only two hours, so you have to download it when you need it later.
Add a table record using the Airtable API
Use the create records endpoint to add a row. Just like the "list records” endpoint (see above), this page shows a curl example. The URL is identical, but this time using POST method, and new records are passed in via the post body. The format for this is like what you got back from "list records”, so you might use that as an example.
In Flowlet, the request looks like the one below.
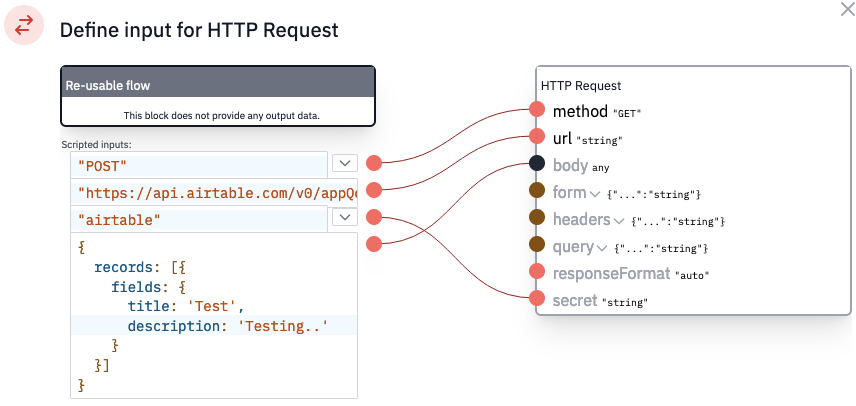
Note that "title” and "description” here refer to column names in Airtable. The provided fields must match the names that you see in Airtable. Empty fields may be omitted.
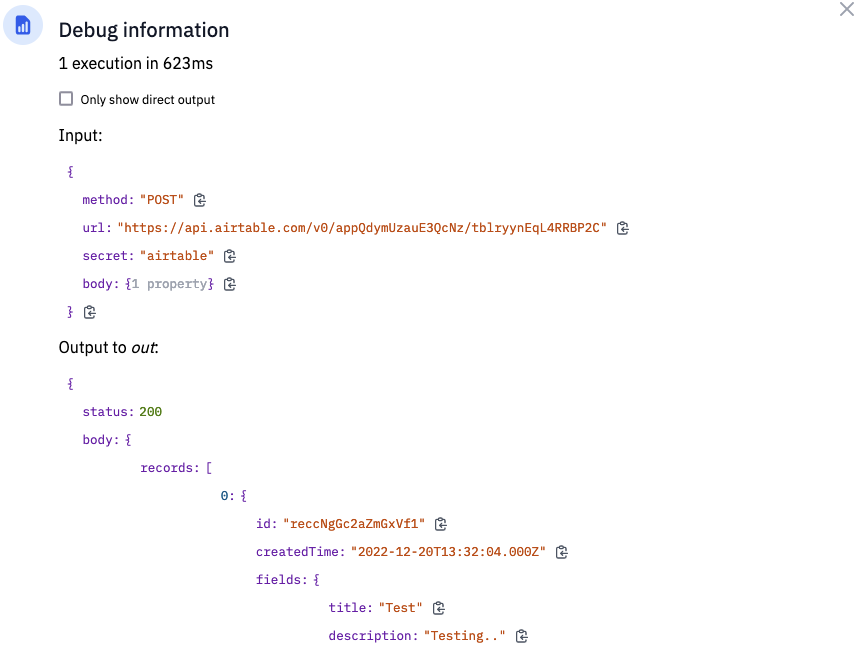
If you test the flow and take a look at the debug output, you'll notice that Airtable returns a list of the created records amended with a newly generated id. You may not need this data, but if you want to use it in the flow, add the suggested validate block described earlier in this blog. For example, you can store the id to update this record later on.
Adding attachments
The Airtable API does not provide a way to upload attachments directly. Instead, you must provide a URL where Airtable can download the file. This may, or may not be an easy task, depending on the source of the attachment. An example post data with attachment is:
{
  "records": [{
    "fields": {
      "title": "Regular field value",
      "image": {
        "url": "https://example.com/image.png"
      }
    }
  }]
}
Update a table record
Airtable provides two endpoints to update records; update record for updating a single record and update multiple records for bulk operations. We'll use the former in this post.
The URL is similar to what we've seen when reading and adding records, but with an added recordId. You can get this identification number in two ways. First, it's returned from the list records or add record endpoint. Otherwise, you can get it from the Airtable interface after opening a record. The URL contains all required ids. The segment starting with "rec” is the record id, for example, recdkSI5Zv9x878eU.
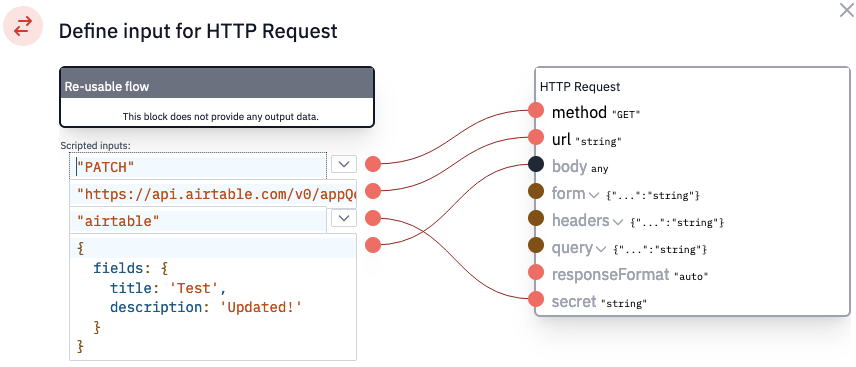
You have to choose between two HTTP methods; PUT or PATCH. The former puts the provided data in this record without merging anything. The latter will keep fields not provided in the API call. In this example, we will set a single field and use the PATCH method.
The format for the post body of the bulk operation is identical to the structure we have used to add a row. For the "update record" endpoint, however, you provide a single item from the "records” array. In Flowlet, this call looks like this:
The output contains all fields for this record, even when not provided in a PATCH request.
Delete a table record
Deleting a row is done with the same API call as an update but with the DELETE method and no request body. You may refer to the Airtable documentation for the delete record endpoint.
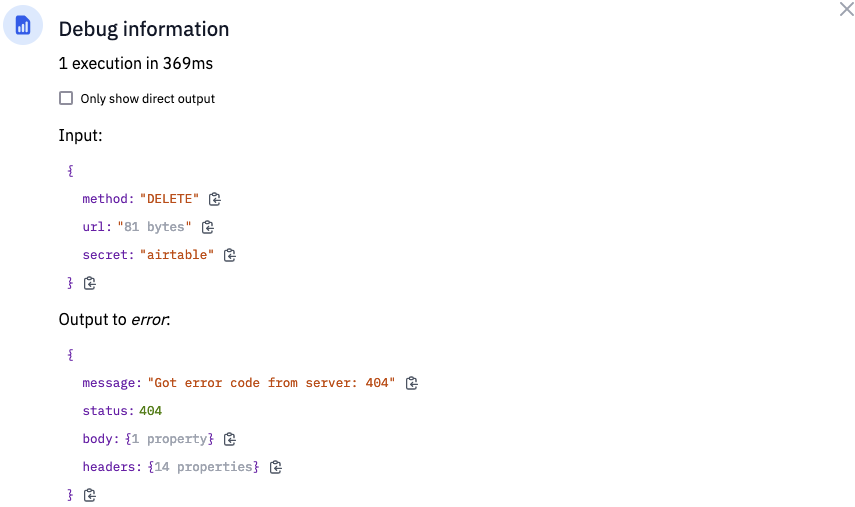
There is not much that you will find in the output. To catch errors, you simply use the "error” pin. The flow continued here when the record was not found or when you did not have permission to delete the record.

You will receive the exact error in the debug output.
Setting up OAuth with Airtable
Some operations are available only with OAuth access tokens. Setting up OAuth requires a few extra steps compared to personal access tokens. However, Flowlet's generic OAuth integration takes the burden out of this process. You may review the blog post on connecting with OAuth2 APIs first. This post will explain this process only briefly.
To get started, go to Settings > Secrets in your Flowlet workspace and add a secret of the type "OAuth2”. Give it the name "airtable-oauth” — or any other name you haven't used yet — and take note of the Redirect URL shown in this dialog.
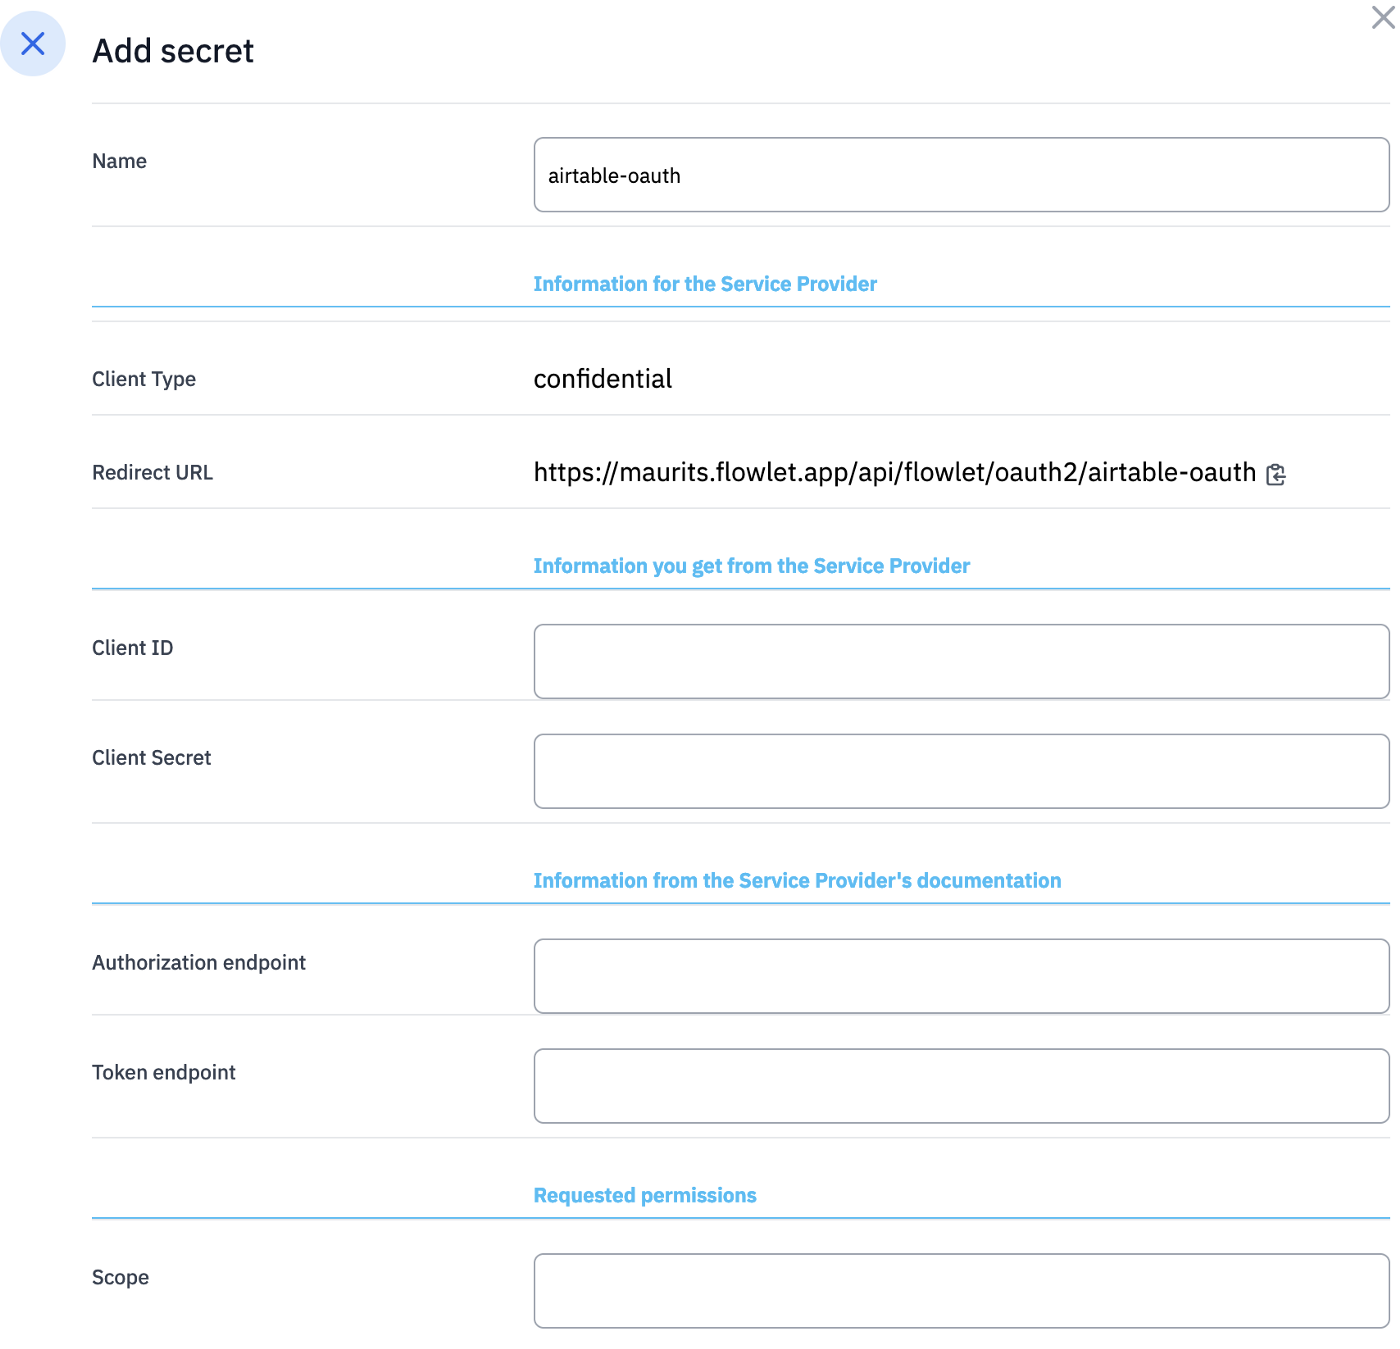
Before completing this form, register your application at the Airtable developer portal. You are asked to provide a name and Redirect URL in the first step. Provide any name and copy over the URL that Flowlet provided. When proceeding, you are given a Client ID and the option to generate a Client Secret. Paste both details in the Flowlet dialog.
Furthermore, you have to check the permissions you will use (or all if you are not sure yet). You need to provide the scope as well in the Flowlet secret. The value is space-separated here, so if you have checked all permissions, then the value for scope is:
data.records:read data.records:write data.recordComments:read data.recordComments:write schema.bases:read schema.bases:write webhook:manage
The last details you will need are the authorization and token endpoint. For Airtable, these are:
https://airtable.com/oauth2/v1/authorize
https://airtable.com/oauth2/v1/token
Save the secret and click on "manage tokens”.
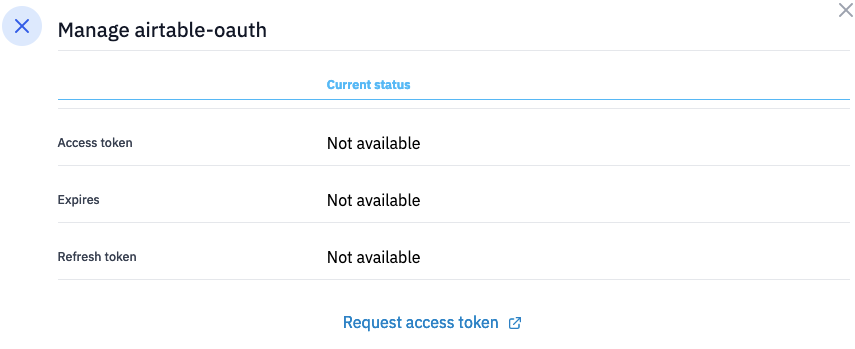
No token is available yet, but you can authorize Flowlet with your Airtable account by clicking the "Request access token” link. You should now see a page where you can authorize Flowlet. Click on "Add a base” before the "Authorize” button enables.
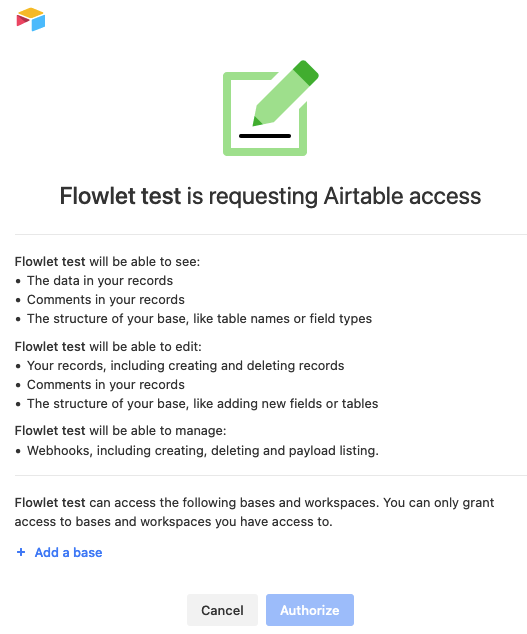
In case of an error, you will return to Flowlet without seeing this page. Double-check the client id, client secret, and scope settings if this happens.
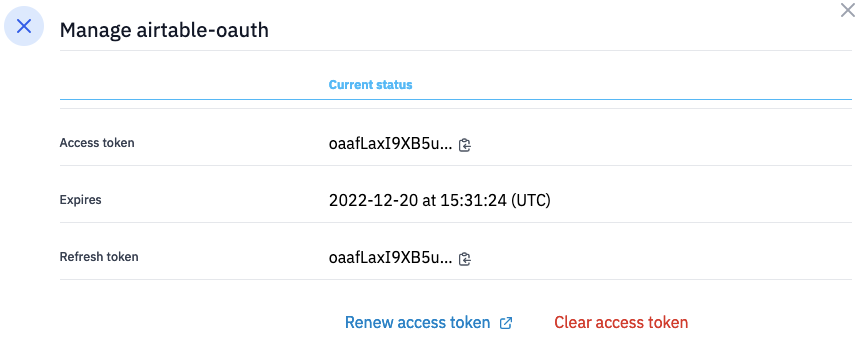
An access token is available after you've successfully authorized Flowlet. The token expires quickly after it was requested and hence might show that it is expired. This is not an issue since Flowlet will automatically request a new access token using the refresh token when needed.
You are now ready to make API calls using OAuth. Also, note that you can use this OAuth secret instead of the personal access token for all API calls described earlier in this post.
Add a comment using Airtable's API
The create comment endpoint is designated for this task. Its URL is similar to the update record action, but with "/comments” appended. The post body is an object with only the "text” attribute, as shown below.
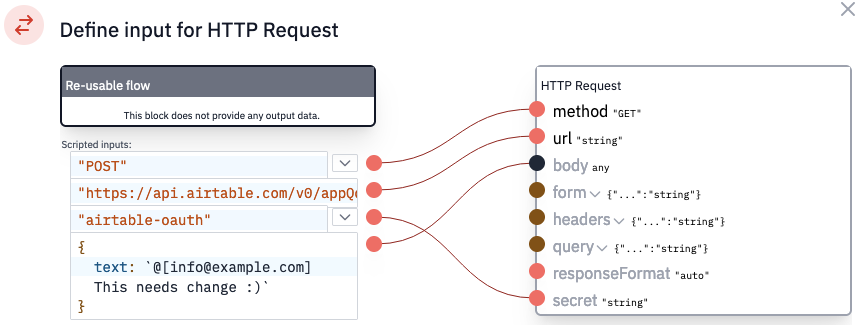
Make sure that you use an OAuth secret, as a personal access token will currently not grant the required permission.
When defining the post body, you may use backticks to enclose multiline strings. This is a standard JavaScript feature but not present in JSON. Also note that you can use mentions, as seen above. These are visible in Airtable as mentions, but you will not currently get a notification for this.
Use AirTable's webhooks to listen for changes
At the time of writing, Airtable does not provide a user interface to manage webhooks. You need to create webhooks using an API call, and you need to authenticate using OAuth for that. Furthermore, we found complexities in Airtable's webhook implementation not commonly found in other webhooks. Due to this nature, this section is more extensive and technical than any of the actions described above.
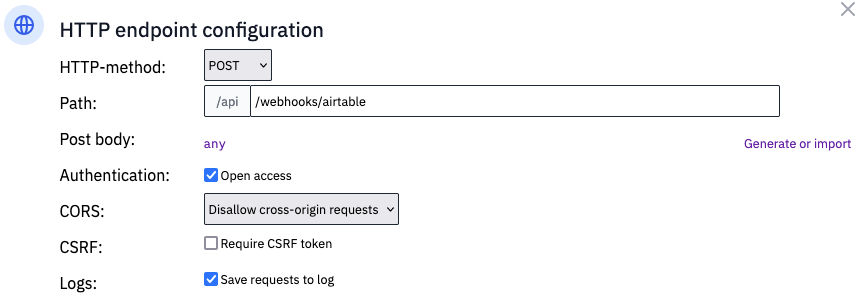
As with any webhook, we create an HTTP request flow using the POST method. Also, check the "save requests to log” checkbox. In this example, we will use the path "/webhooks/airtable”, but you may use any path you prefer. After saving the configuration, shortcut the request pin to the response pin of the output block. You do not have to provide any tangible output, but the effect is that Flowlet responds with a 200 OK instead of an error code. An error response will instruct Airtable to repeat the same webhooks regularly until it gives up.
Now we need to enable this webhook in Airtable. As said, we have to use an API call for this, for which we have the create webhook endpoint. According to the docs, this should work with personal access tokens, but these are rejected now. Before we continue, set up the OAuth secret as described above. That allows you to grab an access token using the "manage tokens” link on the secrets page. Click on "Renew access token” to request a new token when the token is expired. Also, you need a base id and table id. Refer to the "reading table rows” section to learn how to obtain them. You now have everything to complete the curl example listed in the Airtable docs.
The curl example contains a key named "recordChangeScope”. Its value is a table id, so you will need to replace that one as well. Aside from replacing the tokens, you may also append "| jq” to the command for pretty output (only if you have jq installed). Below is an example of the complete API call using curl:
curl -X POST "https://api.airtable.com/v0/bases/appQdymUzauE3QcNz/webhooks" \
-H "Authorization: Bearer ACCESS_TOKEN" \
-H "Content-Type: application/json" \
--data '{
    "notificationUrl": "https://WORKSPACE.flowlet.app/api/webhooks/airtable",
    "specification": {
      "options": {
        "filters": {
          "dataTypes": [
            "tableData"
          ],
          "recordChangeScope": "tblryynEqL4RRBP2C"
        }
      }
    }
  }' | jq .
The output for this command is similar to the one below.
{
  "id": "achA8ctcRcIw0XsRi",
  "macSecretBase64": "lB4G/e....",
  "expirationTime": "2022-12-27T15:38:49.315Z"
}
The expiration time is seven days later. Airtable will not call your webhook URL after this date unless you refresh this webhook. The refresh webhook endpoint is available to do so. Set up an automated task flow in Flowlet to perform this call daily (because the interval between weekly tasks might be slightly more than a week). Add an HTTP request block for this call. Set the method to POST, add the OAuth secret, and set the URL to "https://api.airtable.com/v0/bases/{baseId}/webhooks/{webhookId}/refresh”. The webhookId is the id you received when creating the webhook.
Now that we have set up the webhook with Airtable, it is time to see what is coming in. Change a record in Airtable and then go to the logs in your Flowlet workspace. If all goes well, you will see a log similar to the one below.
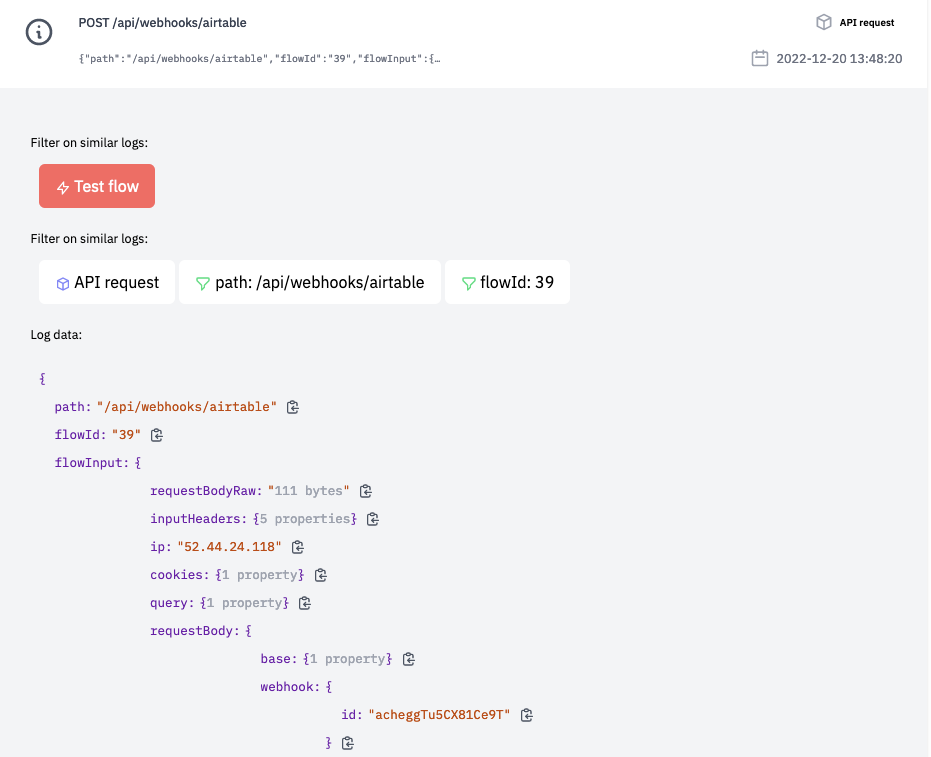
There isn't much data to find here. In contrast, most webhook providers send the relevant details with the webhook. Airtable, however, sends a ‘ping' to let your system know something has happened. To find out what that is, we must perform another API call to get the actual payload, which is what the list webhook payloads endpoint is for. If you implement this request and add the validate block, then you will find out that its response has the following format:
{
  "payloads": [
    {
      "timestamp": "1970-01-01T00:00:00Z",
      "baseTransactionNumber": 123,
      "actionMetadata": {
        "source": "string",
        "sourceMetadata": {
          "user": {
            "id": "string",
            "email": "info@example.com",
            "permissionLevel": "string",
            "name": "string",
            "profilePicUrl": "https://example.com"
          }
        }
      },
      "payloadFormat": "string",
      "changedTablesById": {
        "tblryynEqL4RRBP2C": {
          "changedRecordsById": {
            "recThgNXwZIlzxBsw": {
              "current": {
                "cellValuesByFieldId": {
                  "fldSb6Ir03ItQMmcv": "string"
                }
              }
            }
          }
        }
      }
    }
  ],
  "cursor": 123,
  "mightHaveMore": true,
  "payloadFormat": "string"
}
Take care when accepting the suggestion for the Validate block. The schema will include the record id that differs per request. To fix this, edit the schema and click on the "generate or import” link. Change the id to "…” and click the generate button.
The response does contain not only the payload for the last action but also previous calls. There is nothing in the ping request that you can use to filter this list (the timestamp from the ping is usually a few seconds after the payload). It complicates the processing because we have to keep track of what we have already processed. Furthermore, new items are added to the bottom of the list, so we need to use the cursor to fetch more items.
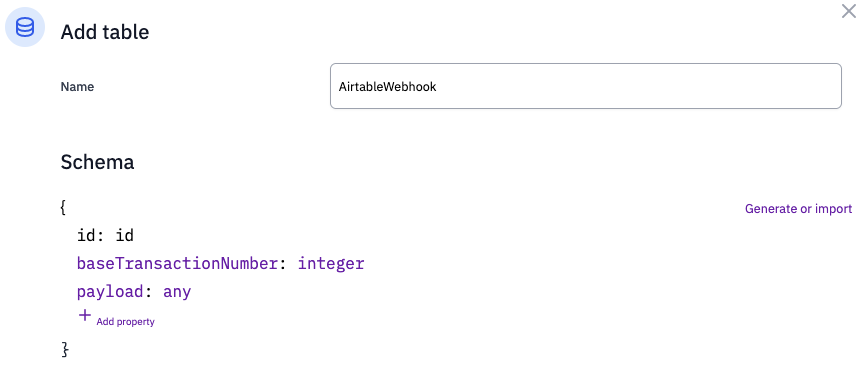
Processing the payloads gets complicated at this point. At least we need a Flowlet table to keep track of the processed payloads. It might be easier to continue in a script here. In Flowlet, scripts are written in TypeScript, and you should fully type their input and output. The debug dialog can help create the type definitions. Click the copy icon three times to copy the data as a TypeScript definition. Using this feature, and with the help of Airtable's documentation, we came up with a type definition for the webhook payloads. Also, we've extended it to a script that filters processed payloads. The script needs the base id, webhook id, and secret name (of the OAuth2 secret). Also, a table named AirtableWebhook is used to store the processed payloads.
Integrating Airtable in your application
Airtable's REST API is straightforward for basic CRUD actions. Flowlet can integrate with this API using the standard HTTP request blocks and built-in authentication.
Can't wait to connect APIs with Flowlet?
- Get started with a 7-day trial
- Follow us on Medium, Twitter, or LinkedIn