Today, Captcha technology is implemented to prevent bots from automatically performing harmful or automatic actions on a site. How do you implement ReCaptcha on your (React) site without having to code? This article teaches how to implement ReCaptcha in just five minutes in Flowlet without coding.

What is ReCaptcha?
Captcha is a security system that was built in the early 2000s. It has become a standard for internet forms and an excellent method for weeding out spambots. And for the curious, it is an abbreviation for Completely Automated Public Turing test to tell Computers and Humans Apart.
In this post, we'll be using the most popular implementation: ReCaptcha by Google. We use version 2 (with the "I'm not a robot” checkbox). Alternatively, you can also use hCaptcha, which is protocol compliant. For more information, you may read CloudFlare's blog on why they've moved to hCaptcha.
An Overview of ReCaptcha Parts
The service provides two components: a frontend (the visible part) and a simple API to verify the responses.
What your application requires depends a bit on the tech stack used. In its simplest form, you only need to add a script tag and a div-element where you want the checkbox to appear. Check the docs for the details. For example, when using a rich frontend with React, you might want to check out this react package.
The last part is your server, where you must connect the frontend response to the API to verify the result. We will demonstrate this part using Flowlet.
Setting Up ReCaptcha
To start implementing ReCaptcha, the first step is to register your website at the admin console. Choose type v2 and provide your website's domain. Make sure to add "localhost” if you want to test on your local environment. Now you get two keys, a site key and a secret key. We need these keys later.
The next step is to embed the ReCaptcha code on your registration form or contact form. The code contains the site key you must replace with the key you got after registration. Once you've updated the web form, a response code is sent with the form submissions. The server must validate this code before we process the submitted data.
By default, the code is sent using a parameter named "g-recaptcha-response”. This might differ when using the React implementation.
Verify the Captcha Response
This section briefly shows how to perform the necessary actions to verify the response. Here, we are using Flowlet, but the steps are similar for all systems.
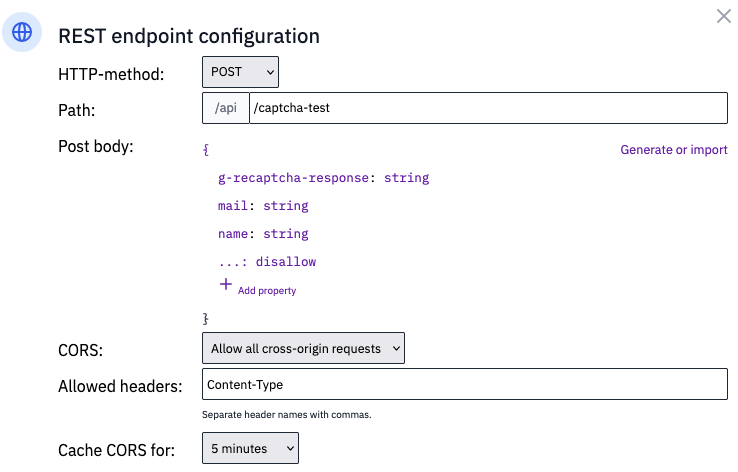
The first step is to add the response parameter to the input body of the relevant endpoint. You can see that in the screenshot below.

Endpoint configuration dialog from Flowlet.app
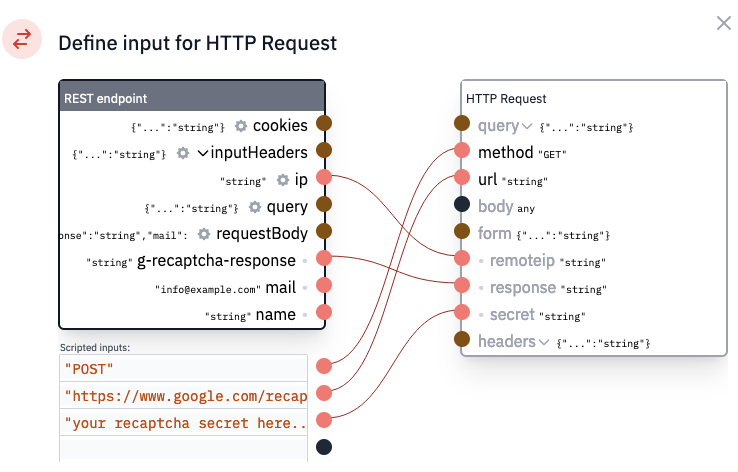
The next step is to post the response to Google. Their endpoint requires the secret key, response, and optionally the user's IP address. Make sure to use form-encoded post data since the API doesn't accept JSON request bodies. This is how we've wired the HTTP request:

Mapping that defines the input for the API request
As always, with external data, you should validate the API response. The documentation shows an example response. If we remove the comments from it to get a valid JSON object, we get something like this:
{
 "success”: true,
 "challenge_ts”: "string”,
 "hostname”: "string”,
 "error-codes”: [
 "string”
 ]
}
In Flowlet, we can copy this JSON in a "Validate” block to assume this structure for the rest of our flow. After that, we define an if-statement to follow different paths based on the "success” boolean in the response. If it's "true”, we can proceed with the intended logic. If not, return an error response.

The completed flow for handling responses
The flow above shows steps as we've configured it in our Low-Code platform. You don't have to configure it yourself, though; the entire flow is available as a single block from Flowlet's marketplace.
Implementing in APIs
You've seen how to create an easy and fair registration process with bot protection. Its implementation does not require coding on the Flowlet platform.
Can't wait to write secure APIs with Flowlet?
- Join the waitlist for the private beta
- Follow us on Medium, Twitter, or LinkedIn