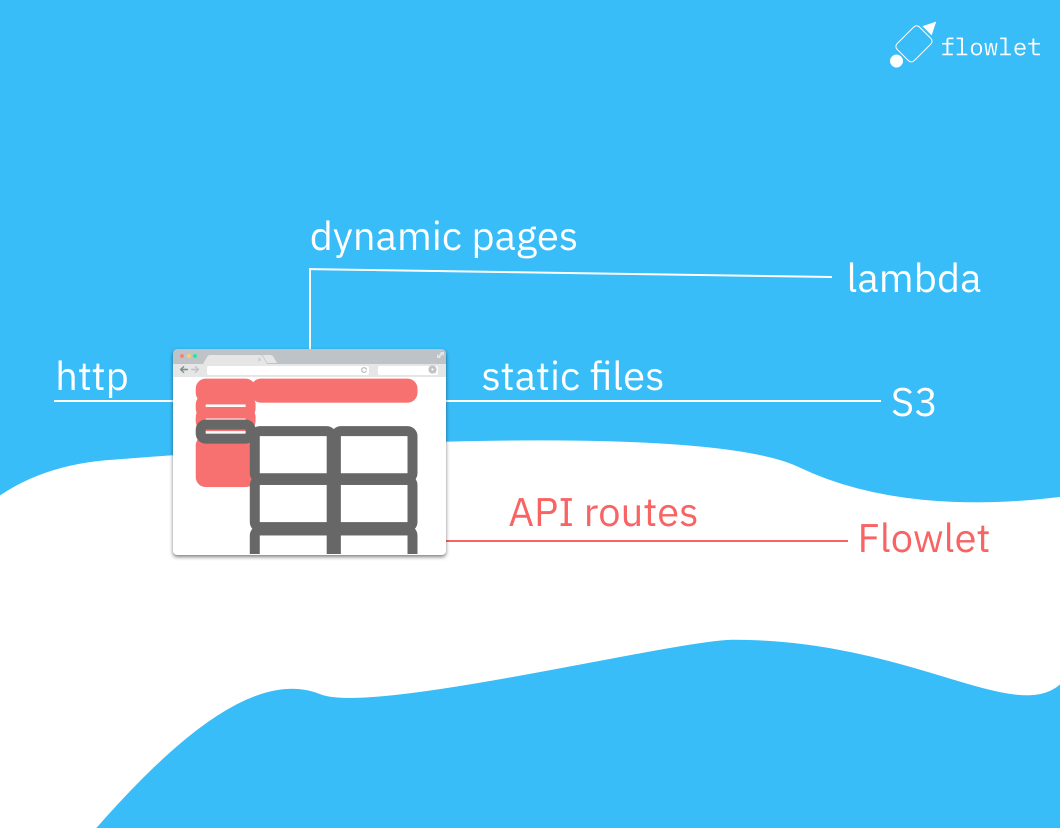
This guide will explore how to host a static website built with NextJS on S3, using CloudFront and Lambda@Edge. This configuration allows for fast and efficient delivery of your website's content while providing a platform for building and hosting your API routes using Flowlet. It is an ideal setup for a website with both static and dynamic content. We will walk through the process of deploying your NextJS app to S3, configuring CloudFront to route requests, and using Flowlet for API routes.
What do we get from the next export?
NextJS's export feature generates HTML files for all pages defined in the pages directory. However, when it comes to dynamic routes, such as those for user-generated content, we need to use the getStaticPaths
and getStaticProps
methods.
Dynamic paths known on build time
First, NextJS's getStaticPaths method lists all pages when they are known on build time. Below is an example for /pages/blog/[...path].tsx using Contentlayer.
import { allBlogs } from 'contentlayer/generated';

export async function getStaticPaths() {
  // List all paths and strip off the '/blog/' part.
  const paths = allBlogs.map(post => ({ params: { path: post.path.split('/').slice(2) } }));
  return {
    paths
  };
}

export async function getStaticProps(context) {
  const blog = allBlogs.find(post => post.path == '/blog/' + context.params.path.join('/'));
  return {
    props: {
      path: context.params.path,
      blog
    }
  };
}

const BlogsPage = ({ blog }: { blog: Blog }) => {
  return <section/>;
};

export default BlogsPage;
Note that you must include both the path and component parameters in getStaticProps.
By running next export, NextJS will produce an HTML file per blog post.
Dynamic paths for user-generated and other dynamic content
When content continuously changes, we cannot run a deployment on every change. Yet, we still need to implement the getStaticPaths method to get at least one exported HTML file. We may define a dummy page and accept loading all content client-side. It would help if you didn't do this for SEO-relevant content, but it's acceptable for pages only visible to authenticated users.
The idea behind this approach is to define one path in NextJS's getStaticPaths that uses a wildcard to represent all possible user-generated content IDs.
We will handle the routing in Lambda@Edge.
In getStaticProps, we then return empty data for these IDs. This allows the exported HTML files to contain a single page that can load the accurate data client-side using the actual IDs.
To implement this approach, we first define the dynamic route in our pages
directory, using a parameter in the file name to represent the ID of the user-generated content. For example, a route for a blog post might be defined as pages/blog/[id].js, we implement the following methods:
export async function getStaticPaths() {
  return {
    paths: [{ params: { id: '@id' } }]
  };
}

export async function getStaticProps(context) {
  return {
    props: { query: { id: '' } }
  };
}
This change will result in an exported page at blog/@id.html.
Finally, in our component file, we can use the id
parameter and useEffect
hook to fetch the data client-side and display the user-generated content on the page.
This approach allows us to handle user-generated content while still taking advantage of NextJS's export feature to create a fast, statically-generated website.
Routing dynamic NextJS paths with Lambda@edge
The result from next export contains ".html" suffixes and wildcards for dynamic paths. For routing these, we will use a Lambda@edge function to handle the ".html" suffixes and wildcards.
After running the next export command, we will generate a router-paths.txt file that lists all the exported pages. This file is added to the export and used by the Lambda@edge function to map the incoming request's path to the correct HTML file on S3. This approach allows for dynamic routes while still leveraging the benefits of a static site.
The commands for creating a release are:
npx next build
find out -name "*.html" | sed -E 's:out/(.*):\1:g' > out/router-paths.txt
AWS s3 sync --delete out s3://BUCKET_NAME/
You need to replace BUCKET_NAME with the name of your S3 bucket. Now is a good time to create it. Head over to the AWS S3 console and click on "Create bucket". Choose a name and region. The region is preferably close to most visitors, but choose whatever you wish. We will read it only from CloudFront and Lambda@edge functions, both running worldwide. You can leave all other settings as-is, including the "block all public access check". Run the commands above after creating the bucket to fill it with the static export.
Now create a Lambda function from the Lambda console. Create this function in the North Virginia region ("us-east-1"). That is a requirement for Lambda@edge. Ultimately, it will run on the edge close to the user, but this region is used for deployments.
Click on "Create function" and select "Author from scratch". The Lambda function uses the NextJS 18.x runtime. Expand the "Change execution role" fieldset and select "Create a new role with basic Lambda permissions".
After you've created the function, replace the empty index.mjs with this gist for the routing Lambda and replace the S3_REGION to the region where your S3 bucket is located (should be something like "us-east-1" or "eu-west-1"). Also, replace the S3_BUCKET_NAME with the name you chose.
Go to "Permissions" at the function settings and look up the execution role. Click on it to go to the role configuration. Now add the "AmazonS3ReadOnlyAccess" permission. The Lambda function needs this to read the router-paths.txt file from the bucket.
To test the function, create a test event with the following JSON code:
{"Records": [{"cf": {
  "request": {
    "uri": "/blog"
  }
}}]}
Make sure to use a path that exists. The test output should give a response like
{
  "uri": "/blog.html"
}
The response path is the file from the NextJS export we need to fetch from the S3 bucket. You may also test this with dynamic paths. When all goes well, go to the "Versions" tab and click on "Publish new version". Then click the "Copy ARN" button to get this function's (version-specific) ID. We need this ID for the CloudFront configuration in the next section.
Setting up CloudFront
To set up a CloudFront distribution, we first need to go to the CloudFront console and click on "Create Distribution." In the "Origin" section, we select our S3 bucket as the origin and give our distribution a name. We choose also "Redirect HTTP to HTTPS" for the viewer protocol policy and save.
We need to explicitly allow CloudFront to access the S3 bucket because all public access to the S3 bucket is blocked. Set the "Origin access" field to "Origin access control settings". Click on "Create control setting" to create a new config. The default values in the dialog are fine. After creating the distribution, a blue box appears that informs you about the bucket policy. Click the "Copy policy" button and the "Go to S3 bucket permissions" link to set this config in the bucket.
Next, we go to the "Origins" tab and add an origin to handle API requests. We give it the origin domain "WORKSPACE.flowlet.app" and save it. Then, we go to the "Behaviors" tab. We need to create three behaviors to handle different types of requests. The first behavior is for static assets that can be directly fetched from S3. The second behavior is for dynamic pages that must use the Lambda function we created earlier. The third behavior is for API requests that must use the Flowlet origin.
Edit the default behavior created automatically and, under "Function associations", provide the ARN for the Lambda@Edge function for "Origin request". Also, create a new behavior with the path pattern "/./" that uses the S3 origin but no Lambda function. Then we create the behavior with path "/api/*" with the Flowlet origin, allowing all HTTP methods in its config. We set the Cache policy to "CachingDisabled" and the Origin request policy to "CORS-CustomOrigin". The latter determines which headers are passed to the origin.
Once all the settings are done, we wait for the deployment to finish (we can see the status on the distribution overview page) and go to the distribution domain name (on the same page) to test if we can access our website.
Using a custom domain
This section will discuss how to use our domain name for the CloudFront distribution instead of the default "cloudfront.net" subdomain. To do this, go to Route53 and create a new hosted zone for our domain. We updated the nameservers for our domain to use the nameservers provided by Route53.
Next, we request a new TLS certificate with AWS Certificate Manager. We edit our CloudFront distribution, set the custom domain name, and link the certificate we just created. Then, we add an A and AAA record in Route53 and set it as an alias to the CloudFront distribution. If it doesn't show up in the suggestions, it indicates something is wrong with the configuration. Likely the custom domain name is not set.
After propagating the DNS changes, we can test our site on our custom domain.
Fixing the Permission Denied errors for 404 pages
CloudFront will return an ugly permissions error if you go to a page that doesn't exist. The reason for this 403 is that S3 returns a permission denied error for unknown objects. The ListObjects permission is required to know if an object exists, but the policy doesn't have that. However, there is no valid reason for 403 errors here. We can fix it at the "Error pages" tab in the CloudFront distribution settings. Set a custom page for both 403 and 404 errors, for example, to /404.html. You should override the HTTP status code for 403 errors and set it to 404 because that is the valid response code for the visitor.
Build an API-first web application
In conclusion, this blog post has provided an in-depth guide on how to host a static website built with NextJS on S3, using CloudFront and Lambda@Edge. We have shown how to use Flowlet as the dev and hosting platform for the API routes of the website while using S3 to host the static assets.
By following this guide, you will have a fully functional, scalable, and fast NextJS website that can easily handle static and dynamic content. You can use this setup to build an API-first website.
Want to create your API-first web application using Flowlet?
- Get started with a 7-day trial
- Follow us on Medium, Twitter, or LinkedIn